
How to Photograph the Milky Way
If there is a most technically
impressive form of photography that is accesible to almost anyone,
wide-field landscape astrophotography is probably it. Astrophotography
in its simplest form is increasing in accessibility, especially with
today’s affordable, large sensor, high signal-to-noise ratio digital
cameras. In my opinion, there are few photographs that have as much
existential impact as a nighttime landscape against the Milky Way. Here,
I will show you how to make an amazing photo of the Milky Way Galaxy
with a minimum of effort and a minimum of equipment.

Of all the items on the list above, a dark location is probably the hardest thing to find. Two-thirds of the United States population are unable to see the Milky Way Galaxy due to light pollution. Unless you are lucky enough to live in a remote rural location with super dark night skies, you will probably need to make a trek out somewhere relatively remote in order to photograph the Milky Way. This is a great opportunity to explore new places. If you live in North America, check out the Clear Sky Charts on cleardarksky.com. There you will find light pollution maps and forecasts for locations with the darkest skies.

Once you pick your location, plan on venturing there some time between the last quarter and first quarter of the moon calendar, ideally during a new moon. This is not a hard rule, but the closer date to the new moon, the more time you will have during the night with dark, moonless skies. Lastly, keep in mind that the “galactic center” of the Milky Way is visible in the sky longest from April to September toward the south half of the sky.
For the examples in this article, I chose Panamint Valley in April as my location and time. Panamint Valley is a remote desert valley just west of California’s Death Valley National Park.
Digital SLR (DSLR)
It is a misconception that you need a $7000 camera and lens combination to make a great Milky Way photograph. You can make a Milky Way photograph with a used $150 Canon Digital Rebel off of craigslist. Pretty much any DSLR camera is capable of photographing the Milky Way. That said, newer cameras are generally better for their low noise at high ISO performance. I will be using a Canon EOS 6D.
Also, there are cameras other than DSLRs that will work such as mirrorless cameras like the Olympus OM-D or Fujifilm X-Pro1 and some large sensor point and shoots like the Sony RX100 or the Fujifilm X100s, but for simplicity’s sake, a DSLR is more common and harder to beat from a price-to-performance standpoint and that is what I will be using here.
Fast Wide Angle Lens with f/2.8 or Lower Maximum Aperture
Other than a dark location at a dark time of night, a “fast” lens is the most important thing that will make your Milky Way photograph the easiest to make. The important thing here is the aperture f-stop rating. The lower the f-stop rating, the faster and better the lens will be for really dark shooting conditions. Most digital camera kits come with the ubiquitous 18-55mm f/3.5-5.6. The maximum aperture of that lens (at 18mm) is f/3.5 which is a little bit “slow” for Milky Way photography. This doesn’t necessarily mean that you will not be able to squeeze by with a slower kit lens, but it won’t make it as easy because the lens will not be able to collect as much light.
My absolute favorite lenses to use for Milky Way photography are the manual focus Rokinon 24mm f/1.4 or Rokinon 14mm f/2.8. Both of these lenses are relatively affordable, ($350-$450) excellent for nighttime landscape photography and they are available on a wide range of SLR mounts including Canon, Nikon, Sony, Olympus, and Samsung. You will be hard pressed to find better lenses for night photographs any price. See David Kingham’s article about Rokinon lenses for a more in-depth review of their lenses for night time photography. Also a wide angle with a focal length of about 24mm or less will be best. The Milky Way is pretty huge and so a wider angle lens will make it easier to capture as much of it as possible. The shorter the focal length, the wider the lens.
If you cannot afford a fast wide angle lens, I highly recommend renting one from a local camera shop or BorrowLenses.com.
 Tripod
There’s nothing special to remember for your tripod choice, just make sure it’s stable enough for your camera. I have even made successful Milky Way photographs with the pocket-sized UltraPod II .
.
 Flashlight or Headlamp
Since you’ll be in the dark, a flashlight or headlamp is pretty much a necessity. I prefer an LED headlamp with a red “night vision” mode. This will allow you you use the light without ruining your night vision and will keep both your hands free to handle your camera equipment. Petzl headlamps are my favorite from experience.
 Intervalometer Remote Timer (Optional)
An intervalometer will allow you to trigger your camera remotely without pressing the shutter button. It will also allow you to take exposures longer than 30 seconds when your camera is in Bulb (B) exposure mode. I will not directly cover the use of an intervalometer in this article because it’s not specifically necessary but can be handy nonetheless. You can find them on Amazon.com for $15-$35.
 iPhone or Android Star Map App (Optional)
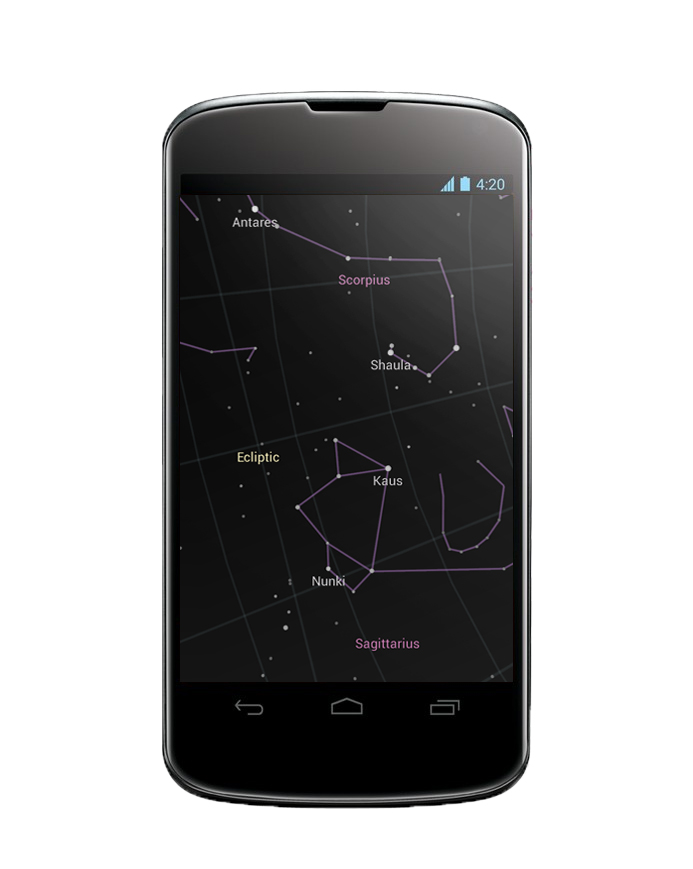
Google Sky Map for Android or Night Sky Lite for iPhone are both free and easy to use star map apps for your smartphone. These apps are excellent tools for finding the center of the Milky Way. Just look for the constellations Sagittarius and Scorpius. The center of the Milky Way is right between Sagittarius and Scorpius. In general, the center of the Milky Way is always toward the South half of the sky if you live in the Northern Hemisphere. Use the app to familiarize yourself with where those constellations are, that’s where you will be pointing your camera.
 Don’t have a smartphone? Check out the free and open source software Stellarium for Mac, Linux or PC.
I am going to suggest some settings that will be a good ballpark start for your exposure. You may not even have to change them for your final exposure but that will depend on things like moonlight, light pollution, your camera, and your lens. We will start here and adjust accordingly. You should be familiar with each of these settings and how to change them. If any of these settings are unfamiliar to you, review your camera’s manual for how to change the setting.

I like focusing before composition because it’s generally easier to focus your camera first, tape your focus ring, and then re-compose later. In general, you will want to make sure your lens is in manual focus mode (M or MF) and is focused at infinity. But rather than just setting the focusing ring to the infinity mark (on some lenses) and forgetting about it, we will want to make more precise focus adjustments to ensure the best possible photo quality. Here are a couple methods that I use to focus in the dark.
Composition and Finding the Milky Way Galactic Center
Using your eyes and your smartphone app as a guide, frame up your landscape scene with the center of the Milky Way in the background. The center of the Milky Way should be in the southern half of the sky, rising in the west and setting in the east. Don’t neglect the foreground, this is the element of your photograph that will make your photograph unique. I really love keeping my tripod low to the ground with some sort of foreground feature like a person, a tree or a rock formation framed along with the center of the Milky Way. Remember, you can always re-frame your camera after you have made some test shots.
 Adjusting Exposure
The settings that I gave you above when we setup your camera should be a good start. Once you are satisfied with your focus and your framing, the next thing is optimizing your exposure. This is where we will review the camera’s histogram information (The histogram is usually available by pressing “INFO” or “Display” when reviewing photos. Check your camera manual.) Typically we will desire a histogram that shows peaks toward the center of the graph from left to right. See below for examples of histograms for overexposed, underexposed and properly exposed photographs of the Milky Way.


 Here are a few ways to adjust your shot:
The thing to keep in mind here is that less is more. If you push the exposure of your photograph too much in post processing, you will often increase noise levels and reduce the quality of your photograph. For this reason, make your best effort to properly expose your photographs in the camera. There isn’t one right way to process your photograph and my methods might not be best for your particular shot but in general, I focus on just three things:
 White Balance
Apparently, the color temperature of the Milky Way is about 4840°K [pdf]. That said, I use about 3900°K most of the time for my white balance setting but this may just be a personal preference. I don’t typically pre-set white balance on my camera when taking the shot. 90% of the time, I usually just leave it in auto white balance (AWB) and I tend to adjust white balance in post processing. Try 3900°K and adjust from there. I find that 4840°K is a little too yellow/orange in color. Other factors like the moon and the sun can affect your white balance. Even if both the moon and sun are set below the horizon, they will continue to turn the sky a blue tint even an hour or two after they set, forcing the white balance to a higher temperature Kelvin. Adjust until you have a nice neutral picture:
 Exposure (Brightness)
Hopefully the exposure will require the least adjustment. (If you made a good exposure in the camera.) Here I will add about +0.5 Exposure Value (EV), which makes the photograph 50% brighter. Try to avoid adjusting more than +/-1.0 EV unless noise levels allow for it. You will discover that adjustments larger than +/-1.0 EV will usually increase noise levels. The amount of post exposure adjustment necessary will depend on your exposure in the camera.
 Contrast (Curves)
Contrast is the final essential post processing adjustment to use. I tend to increase contrast as much as possible without blowing out highlight or shadow details. Curves adjustment allows for a more precise contrast adjustment of specific lightness values and is my choice for making detailed adjustments. With curves to can make just the darks darker and just the brights brighter. Lightroom also allows you to adjust only designated portions of an image using the graduated filter or adjustment brush tools.
 That’s just about it! Even with a very limited set of tools, it’s
possible to create some amazing photographs of our home galaxy.
That’s just about it! Even with a very limited set of tools, it’s
possible to create some amazing photographs of our home galaxy.
 This lesson should give you the most basic information needed to make
some amazing Milky Way photographs. You have the tools, now all you
need to do is let your creativity go crazy. The cool part is that the
challenge does not stop there. There are a plethora of more advanced and
varied techniques and tools out there like image stacking, star
tracking, time-lapse, light painting, and star-trails that will add new
dimensions to your night images. Check the lonelyspeck.com blog
again next week for another how-to article. If you enjoyed this
article, please re-share it on your favorite social media sites.
This lesson should give you the most basic information needed to make
some amazing Milky Way photographs. You have the tools, now all you
need to do is let your creativity go crazy. The cool part is that the
challenge does not stop there. There are a plethora of more advanced and
varied techniques and tools out there like image stacking, star
tracking, time-lapse, light painting, and star-trails that will add new
dimensions to your night images. Check the lonelyspeck.com blog
again next week for another how-to article. If you enjoyed this
article, please re-share it on your favorite social media sites.
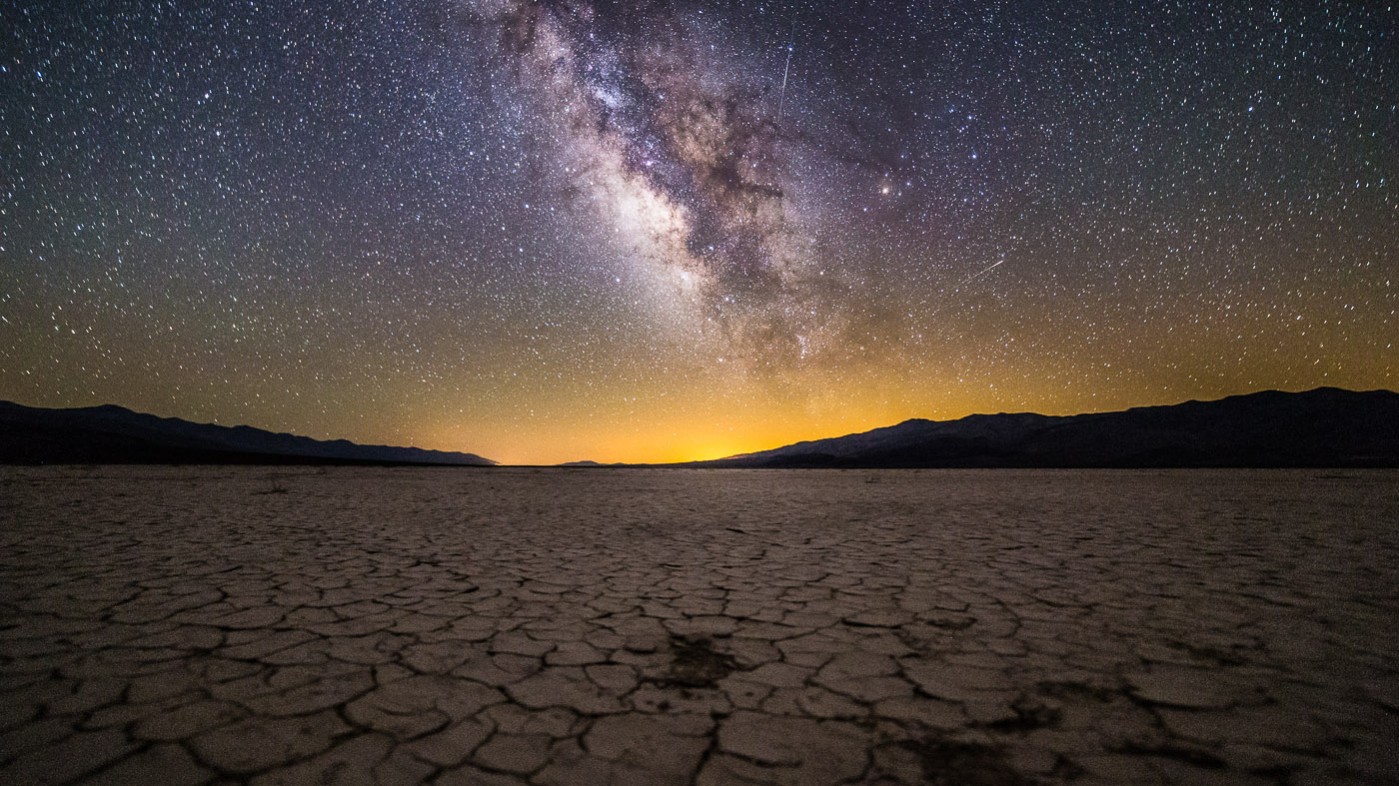
Panamint Playa
What you will need
There are a few things that you will need. Here is a checklist:- Dark Location at a Dark Time of Night
- Digital SLR Camera
- Fast Wide Angle Lens with f/2.8 or Lower Maximum Aperture
- Tripod
- Flashlight or Headlamp
- Intervalometer Remote Timer (Optional)
- iPhone or Android Star Map App (Optional)
Of all the items on the list above, a dark location is probably the hardest thing to find. Two-thirds of the United States population are unable to see the Milky Way Galaxy due to light pollution. Unless you are lucky enough to live in a remote rural location with super dark night skies, you will probably need to make a trek out somewhere relatively remote in order to photograph the Milky Way. This is a great opportunity to explore new places. If you live in North America, check out the Clear Sky Charts on cleardarksky.com. There you will find light pollution maps and forecasts for locations with the darkest skies.

Once you pick your location, plan on venturing there some time between the last quarter and first quarter of the moon calendar, ideally during a new moon. This is not a hard rule, but the closer date to the new moon, the more time you will have during the night with dark, moonless skies. Lastly, keep in mind that the “galactic center” of the Milky Way is visible in the sky longest from April to September toward the south half of the sky.
For the examples in this article, I chose Panamint Valley in April as my location and time. Panamint Valley is a remote desert valley just west of California’s Death Valley National Park.
Digital SLR (DSLR)
It is a misconception that you need a $7000 camera and lens combination to make a great Milky Way photograph. You can make a Milky Way photograph with a used $150 Canon Digital Rebel off of craigslist. Pretty much any DSLR camera is capable of photographing the Milky Way. That said, newer cameras are generally better for their low noise at high ISO performance. I will be using a Canon EOS 6D.
Also, there are cameras other than DSLRs that will work such as mirrorless cameras like the Olympus OM-D or Fujifilm X-Pro1 and some large sensor point and shoots like the Sony RX100 or the Fujifilm X100s, but for simplicity’s sake, a DSLR is more common and harder to beat from a price-to-performance standpoint and that is what I will be using here.
Fast Wide Angle Lens with f/2.8 or Lower Maximum Aperture
Other than a dark location at a dark time of night, a “fast” lens is the most important thing that will make your Milky Way photograph the easiest to make. The important thing here is the aperture f-stop rating. The lower the f-stop rating, the faster and better the lens will be for really dark shooting conditions. Most digital camera kits come with the ubiquitous 18-55mm f/3.5-5.6. The maximum aperture of that lens (at 18mm) is f/3.5 which is a little bit “slow” for Milky Way photography. This doesn’t necessarily mean that you will not be able to squeeze by with a slower kit lens, but it won’t make it as easy because the lens will not be able to collect as much light.
My absolute favorite lenses to use for Milky Way photography are the manual focus Rokinon 24mm f/1.4 or Rokinon 14mm f/2.8. Both of these lenses are relatively affordable, ($350-$450) excellent for nighttime landscape photography and they are available on a wide range of SLR mounts including Canon, Nikon, Sony, Olympus, and Samsung. You will be hard pressed to find better lenses for night photographs any price. See David Kingham’s article about Rokinon lenses for a more in-depth review of their lenses for night time photography. Also a wide angle with a focal length of about 24mm or less will be best. The Milky Way is pretty huge and so a wider angle lens will make it easier to capture as much of it as possible. The shorter the focal length, the wider the lens.
If you cannot afford a fast wide angle lens, I highly recommend renting one from a local camera shop or BorrowLenses.com.
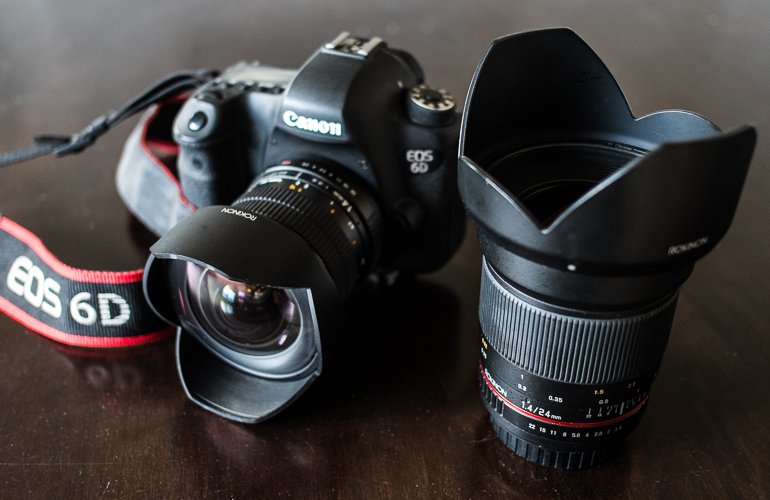
Canon EOS 6D with Rokinon 14mm/2.8 and 24mm/1.4
There’s nothing special to remember for your tripod choice, just make sure it’s stable enough for your camera. I have even made successful Milky Way photographs with the pocket-sized UltraPod II

Slik Pro AMT Tripod and Ultra Pod II
Since you’ll be in the dark, a flashlight or headlamp is pretty much a necessity. I prefer an LED headlamp with a red “night vision” mode. This will allow you you use the light without ruining your night vision and will keep both your hands free to handle your camera equipment. Petzl headlamps are my favorite from experience.
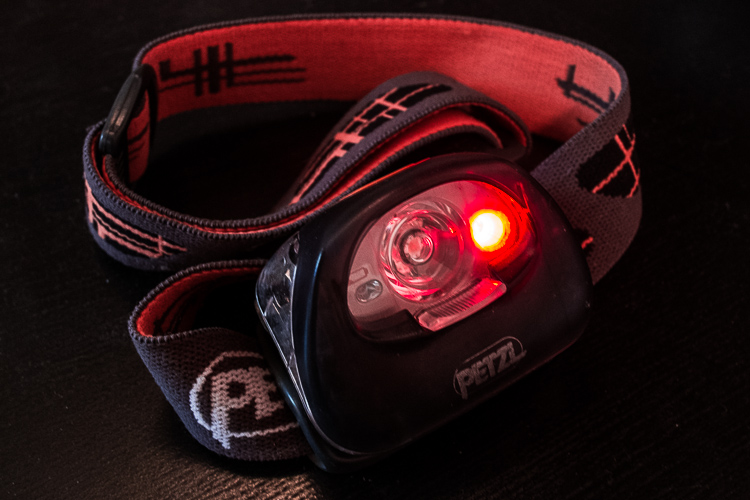
Petzl Headlamp
An intervalometer will allow you to trigger your camera remotely without pressing the shutter button. It will also allow you to take exposures longer than 30 seconds when your camera is in Bulb (B) exposure mode. I will not directly cover the use of an intervalometer in this article because it’s not specifically necessary but can be handy nonetheless. You can find them on Amazon.com
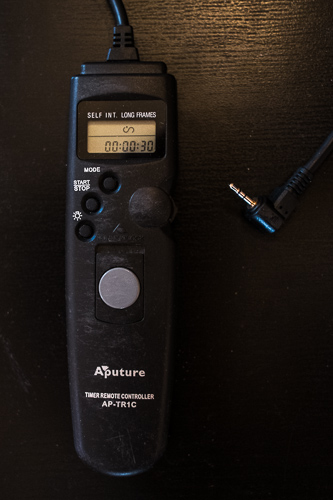
Intervalometer
Google Sky Map for Android or Night Sky Lite for iPhone are both free and easy to use star map apps for your smartphone. These apps are excellent tools for finding the center of the Milky Way. Just look for the constellations Sagittarius and Scorpius. The center of the Milky Way is right between Sagittarius and Scorpius. In general, the center of the Milky Way is always toward the South half of the sky if you live in the Northern Hemisphere. Use the app to familiarize yourself with where those constellations are, that’s where you will be pointing your camera.
Google Sky Map for Android
Making the photo
“You don’t take a photograph, you make it.” - Ansel Adams
Now that you have all your equipment, you are in a beautiful outdoor location with dark skies and you have located the center of the Milky Way with your smartphone app, you are ready to make a photograph. There are a number of things that you’ll need to do to make an exposure of the Milky Way. Here’s a checklist of what we will cover.- Setup your Camera
- Focusing in the Dark
- Composition
- Exposure Adjustment
I am going to suggest some settings that will be a good ballpark start for your exposure. You may not even have to change them for your final exposure but that will depend on things like moonlight, light pollution, your camera, and your lens. We will start here and adjust accordingly. You should be familiar with each of these settings and how to change them. If any of these settings are unfamiliar to you, review your camera’s manual for how to change the setting.
- Shoot in RAW recording mode
- RAW image files contain more data than JPEG files and thus allow for greater flexibility in post-processing adjustments.
- Zoom out to the widest field of view (24mm or wider)
- The wider field of view will reduce streaking of the stars due to Earth’s rotation and will allow us to capture as much of the Milky Way as possible.
- Manual focus
- Use manual focus (M or MF) mode on your lens and set it to infinity if possible. We will focus more precisely later.
- Manual exposure
- Set your exposure mode to Manual (M)
- Set LCD brightness at the lowest
- This is for preserving our night vision as much as possible.
- Enable long exposure and/or high ISO noise reduction if available.
- This will reduce grain on your photos by taking a second photograph without opening the shutter to record and subtract noise data from your image. Note that this will usually add additional wait time to each exposure before you will be able to use your camera again for the next exposure.
- Enable histogram information review.
- This will allow us to see a graphic display of our exposure and adjust accordingly.
- Set a 30 Second Shutter Speed
- 30 Seconds is usually the longest shutter speed most SLRs will be able to do without an optional intervalometer accessory.
- 30 Seconds is about the longest exposure you can use with a 24mm lens without trailing the stars too much.
- Set the lowest f-stop number possible
- f/2.8 or lower is desired so that the lowest possible ISO can be used.
- I have listed exposures below that use f/4.0 if your lens can’t do any lower but you may find that the results are too noisy or that your camera does not support ISO higher than 3200. If that’s the case, go a head and just make due with what you have and use the highest ISO you have available. Just know that a lens with a really low f-stop number, like a 24mm f/1.4 will really help a lot.
- Set the ISO based on the Neutral Exposure list below.
- If your camera cannot do high ISO, you may be forced to underexpose a little by using a setting from the -1.0 EV Underexposure list. In general avoid having to underexpose at all costs.
Neutral Exposure of the Milky Way
30 seconds, f/1.4: ISO 1600
30 seconds f/2.0: ISO 3200
30 seconds, f/2.8: ISO 6400
30 seconds, f/4.0: ISO 12800
30 seconds f/2.0: ISO 3200
30 seconds, f/2.8: ISO 6400
30 seconds, f/4.0: ISO 12800
-1.0 EV Underexposure of the Milky Way
30 seconds, f/1.4: ISO 800
30 seconds, f/2.0: ISO 1600
30 seconds, f/2.8: ISO 3200
30 seconds, f/4.0: ISO 6400
Focusing in the Dark30 seconds, f/2.0: ISO 1600
30 seconds, f/2.8: ISO 3200
30 seconds, f/4.0: ISO 6400
I like focusing before composition because it’s generally easier to focus your camera first, tape your focus ring, and then re-compose later. In general, you will want to make sure your lens is in manual focus mode (M or MF) and is focused at infinity. But rather than just setting the focusing ring to the infinity mark (on some lenses) and forgetting about it, we will want to make more precise focus adjustments to ensure the best possible photo quality. Here are a couple methods that I use to focus in the dark.
- Manual focus with Live View
- This is by far the most accurate method if your camera supports it. Enable live view on your camera and use the focus checking or the digital zoom function on a bright star to make the star appear like a pinpoint. I recommend centering the star in the frame before focusing on it to have the most even focus field. Note that you may need to change the Live View settings on your camera to “exposure simulation” or “manual,” in order to be able to see stars on the LCD. If you cannot see stars in the LCD, try focusing on a flashlight at a distance like in the method below.
- Auto focus or manual focus on a flashlight that is placed far away (greater than 100 feet or so)
- This can be an easy way to get your camera to focus at close to infinity in the dark but can be difficult if you don’t have a helping hand to hold the flashlight for you. It’s often best to place a flashlight next to an object in your frame that is at a distance of 100 feet or greater, the farther the better but after about 150 feet or so, it makes less and less difference. Plus, walking back and forth 300 feet just to focus your camera can be a drag. As soon as you get focus confirmation on the lit object, switch the lens back to manual focus (MF) mode to lock the focus at infinity, being careful not to twist the focus ring and mess up your focusing work. A flashlight can also be helpful if you wish to instead focus on a foreground object rather than infinity.
Composition and Finding the Milky Way Galactic Center
Using your eyes and your smartphone app as a guide, frame up your landscape scene with the center of the Milky Way in the background. The center of the Milky Way should be in the southern half of the sky, rising in the west and setting in the east. Don’t neglect the foreground, this is the element of your photograph that will make your photograph unique. I really love keeping my tripod low to the ground with some sort of foreground feature like a person, a tree or a rock formation framed along with the center of the Milky Way. Remember, you can always re-frame your camera after you have made some test shots.
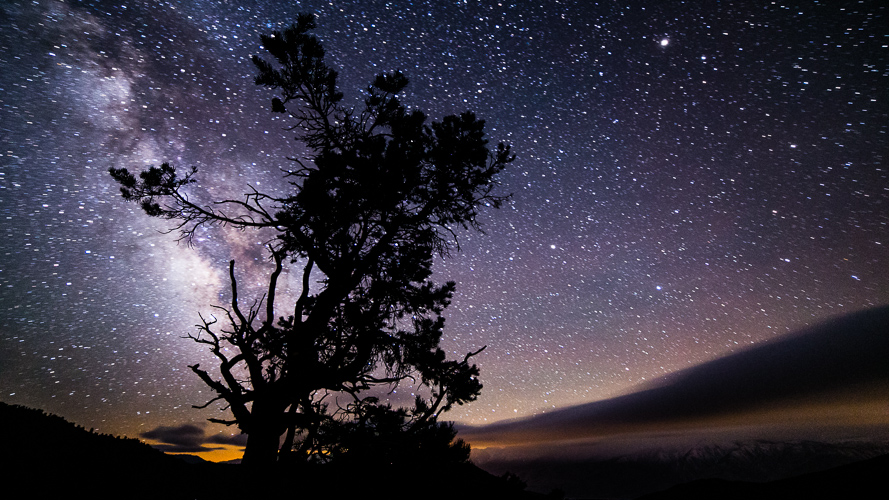
Grandview, Looking Southwest, Ancient Bristlecone Pine Forest
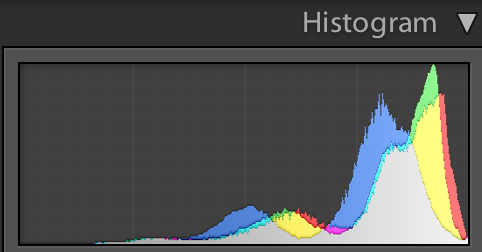
The settings that I gave you above when we setup your camera should be a good start. Once you are satisfied with your focus and your framing, the next thing is optimizing your exposure. This is where we will review the camera’s histogram information (The histogram is usually available by pressing “INFO” or “Display” when reviewing photos. Check your camera manual.) Typically we will desire a histogram that shows peaks toward the center of the graph from left to right. See below for examples of histograms for overexposed, underexposed and properly exposed photographs of the Milky Way.
Overexposed
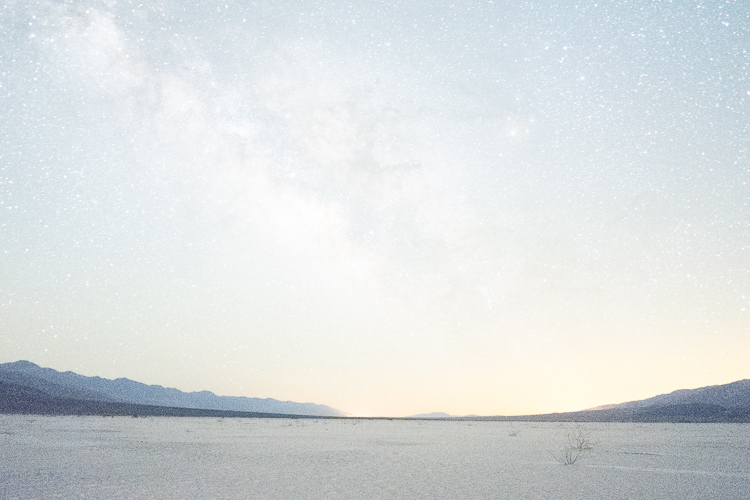
-2.0 EV Overexposure

Underexposed
-2.0 EV Underexposure
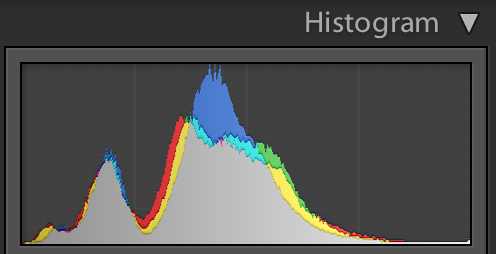
Neutral
Normal Exposure
- Too Dark
- Make sure you are using the lowest f-stop number possible. (f/2.8 or lower is recommended.)
- Increase your shutter length (may cause star trailing). This may require an intervalometer on most cameras to get a shutter speed longer than 30 seconds.
- Increase your ISO (Noisier).
- Too Bright
- Make sure that the moon is set well below the horizon and not visible in the sky. The moon can wash out the view of the milky way. Light pollution from nearby towns can also overexpose your shot.
- Decrease your ISO (Less Noisy).
- Decrease your shutter speed (less star trailing).
- “Stop down” the aperture to a higher f-stop number.
- Too Much Noise
- Decrease your ISO.
- Out of focus
- Re-focus using one of the methods above.
- Depending on the lens, you might need to “stop down” to a higher f-stop number in order to have the sharpest image, especially in the corners of the image. (This artifact is called aberration.) Rokinon lenses are exceptional in this regard and often produce very sharp results in the image corners, even at large apertures (low f-stop number).
Post Processing
If your image was exposed correctly, you should need only a little bit of post processing. RAW images are typically pretty flat and require some post processing to make the photograph as high quality as possible. I personally use Adobe Lightroom to process my photographs. The RAW editor that came with your camera is probably just fine.The thing to keep in mind here is that less is more. If you push the exposure of your photograph too much in post processing, you will often increase noise levels and reduce the quality of your photograph. For this reason, make your best effort to properly expose your photographs in the camera. There isn’t one right way to process your photograph and my methods might not be best for your particular shot but in general, I focus on just three things:
- White Balance
- Exposure (Brightness)
- Contrast (Curves)
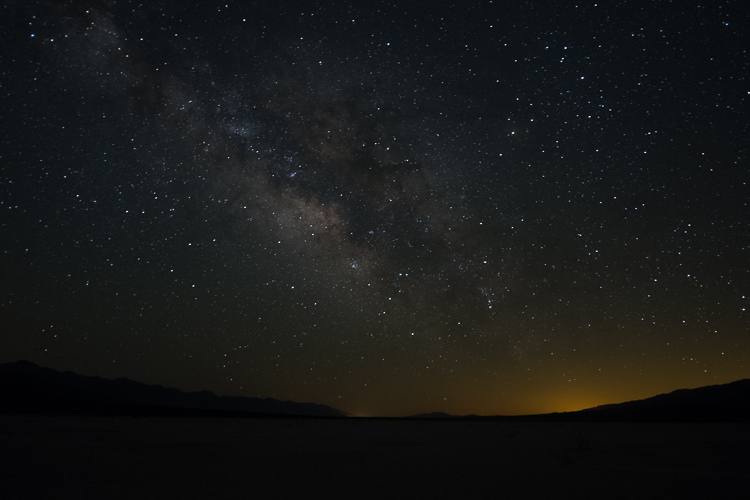
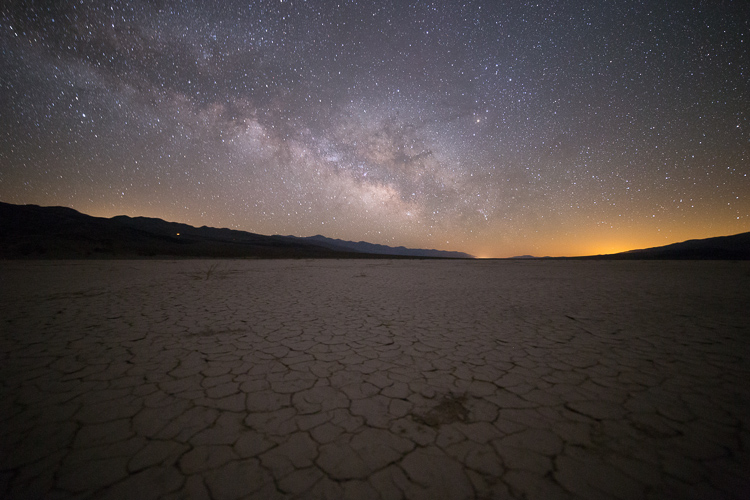
RAW Exposure, Unedited
Apparently, the color temperature of the Milky Way is about 4840°K [pdf]. That said, I use about 3900°K most of the time for my white balance setting but this may just be a personal preference. I don’t typically pre-set white balance on my camera when taking the shot. 90% of the time, I usually just leave it in auto white balance (AWB) and I tend to adjust white balance in post processing. Try 3900°K and adjust from there. I find that 4840°K is a little too yellow/orange in color. Other factors like the moon and the sun can affect your white balance. Even if both the moon and sun are set below the horizon, they will continue to turn the sky a blue tint even an hour or two after they set, forcing the white balance to a higher temperature Kelvin. Adjust until you have a nice neutral picture:
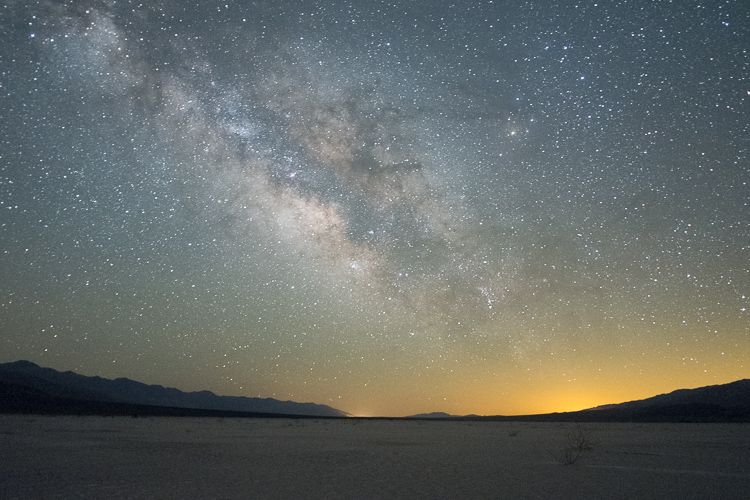
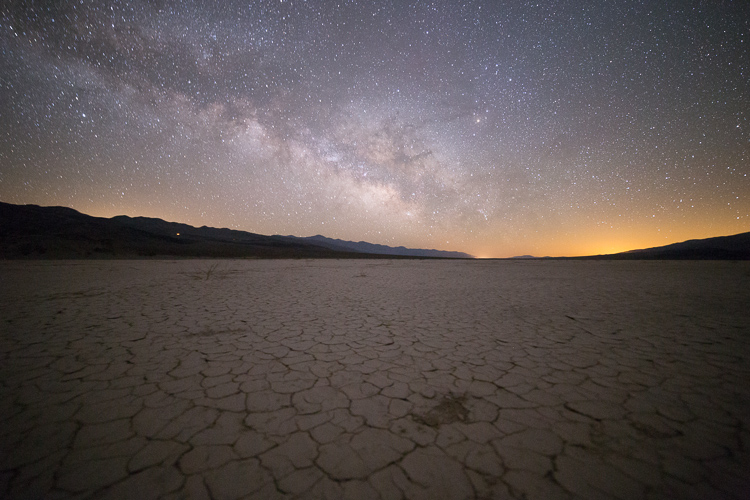
White Balance 3900K
Hopefully the exposure will require the least adjustment. (If you made a good exposure in the camera.) Here I will add about +0.5 Exposure Value (EV), which makes the photograph 50% brighter. Try to avoid adjusting more than +/-1.0 EV unless noise levels allow for it. You will discover that adjustments larger than +/-1.0 EV will usually increase noise levels. The amount of post exposure adjustment necessary will depend on your exposure in the camera.
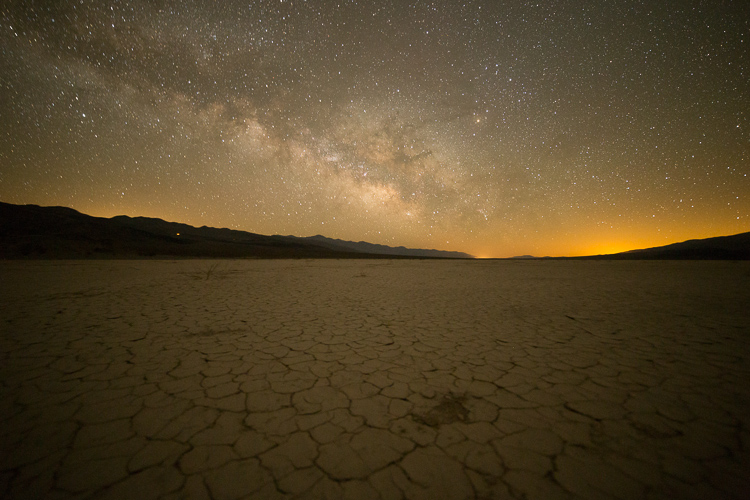
Increased Brightness +0.5EV
Contrast is the final essential post processing adjustment to use. I tend to increase contrast as much as possible without blowing out highlight or shadow details. Curves adjustment allows for a more precise contrast adjustment of specific lightness values and is my choice for making detailed adjustments. With curves to can make just the darks darker and just the brights brighter. Lightroom also allows you to adjust only designated portions of an image using the graduated filter or adjustment brush tools.
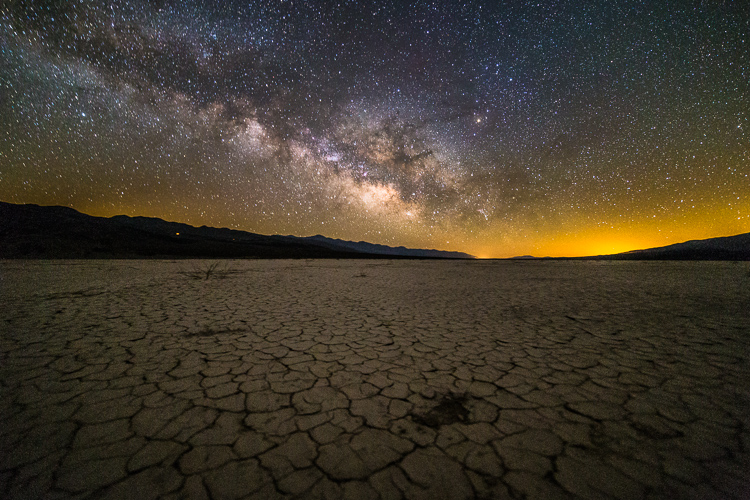
Increased Contrast
Further Exploration

Perseid Meteors at Red Rock Canyon


